

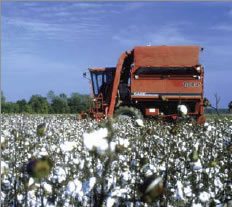
The Spindle-Type Cotton Harvester
In-Season Procedures
Cotton Picker Fires
A fire that starts on a cotton picker may be minor if the operator reacts correctly. However, poor decisions and reactions may result in a total loss of the picker and any cotton in the machine or surrounding areas. A picker fire that begins as a smoldering mass of trash and lint can become uncontrollable in as few as 3 minutes. In as few as 15 minutes, a cotton picker can become almost unrecognizable – tires burned off and bars melted into puddles under the row unit cabinets. Large amounts of grease in row units, high-pressure hydraulic oil, and diesel fuel accelerate a fire once lines and tanks rupture.
Preventing Hazardous Conditions
You may be forced to make snap decisions regarding risk of personal injury or saving the picker from a total loss. The best course of prevention is due diligence in recognizing and eliminating or minimizing conditions that often result in a fire on the picker:
- Dry and windy conditions (humidity in the range of 10-30%) for several days, resulting in seed cotton, trash, and lint with 4-6% moisture content and high potential for static electricity (a condition made worse by light winds and lack of dew formation at night)
- A malfunction of the picker row unit that results in metal-to-metal contact, such as a loose rib that is struck by spindles
- Scrap metal, rocks, or bricks (near old house sites) that enter the row unit while picking
- A row-unit choke or trash accumulation that is undetected, allowing doffers to rub for extended periods on the material
- Trash and lint accumulation on or near components that can be very hot, such as the transmission, belt drive, hydraulic components, engine manifold, and exhaust system
- Poorly serviced and cleaned chassis and row units
- Lint and trash accumulations on hydraulic valve banks
- Operator carelessness or ignorance in dealing with a fire
Operator Fire-Prevention Training
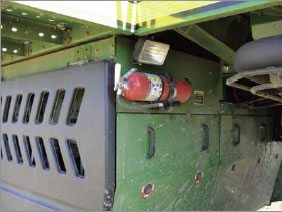
Engine compartment type ABC fire extinguisher.
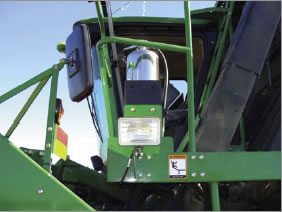
Platform water-based fire extinguisher.
Operator training and practice are vital in fire prevention and control. Operators must learn how to react to a fire on a cotton picker before it happens, as well as how to use fire extinguishers and other fire-control resources. Read and understand the operator’s manual section for fires for the cotton picker to be operated. The following steps are suggested as ways of reducing fire losses:
- Keep a full water trailer and pump in the field whenever possible.
- Be especially cautious of conditions that are likely to result in a fire. Bluebird skies with a slight dry wind after a passing dry front can result in very low relative humidity and dry cotton. Fire dangers are increased and may reach a critical point in mid-to-late afternoon.
- Be alert to any unusual noise, odors, or visible signs of a picker malfunction.
- Be cautious if more frequent row-unit chokes are occurring.
- Remove large accumulations of trash and lint more frequently.
- Inspect and clean the row units and conveyor doors more frequently.
- Slightly increase the spindle cleaner solution application rate, but not to the point that more trash accumulates in the row unit.
- Be aware of any defoliation practices that are more likely to accelerate a fire (use of sodium chlorate and other desiccant materials).
Fire-Prevention Procedures
Customize the following procedures for the picker you are operating and practice it as part of fire prevention training:
- Cotton, oil, belts, and electrical components have very distinct odors when burning. At the first whiff of smoke or indication of fire, stop harvesting, stop the fans immediately, and investigate to identify what might be burning or smoldering.
- If you have a cell phone or radio, alert an emergency contact that a fire is indicated/probable and request help.
- Raise the row units and drive onto the closest turn row or back the picker 20-50 yards into a previously picked part of the field (whichever is nearest and quickest).
- Unload any cotton in the basket, module chamber, or surge hopper, even if you must unload onto the ground. Unload even if you do not see an indication of fire in the basket or module chamber. Delaying this step with a fire burning near a hydraulic hose or fuel line may result in the lines rupturing, fueling the fire with a mist of hot oil or fuel. The seed cotton on the picker only serves as additional fuel for the fire, which would guarantee a complete burn at this point.
- Leave the picker basket or module chamber in the unload position and move the picker the length of the machine away from the seed cotton that was unloaded.
- Stop the picker, place the transmission in park, set the brakes, stop the engine, put on a pair of leather gloves, exit the cab, and look for the fire.
- Inspect the platform area, looking between the duct area and the accumulator, basket, or module chamber. Also look on the tops of the row units. Take a quick look at the top of the picker as you dismount.
- Unless trash or lint is visibly burning or smoldering near the point of catching fire in the basket, surge hopper, or module chamber, you can wait to extinguish it after finishing your overall inspection of the machine. Fires that ignite on the top of the picker rarely result in a total loss.
- Use water-based fire extinguishers and the spindle cleaner solution emergency hose for flash lint and seed cotton fires on the platform and on top of the picker.
- Inspect the chassis as you dismount, looking for indications of fire in the engine compartment area.
- Remove the Type ABC fire extinguisher mounted in the engine compartment and take it with you for the remainder of the inspection.
- If there are signs of a fire in the engine compartment, open doors and remove panels slowly and cautiously, observing the hotter engine components first. Inspect the exhaust system.
- Remove any smoldering lint or trash with a wire hook or stick. Do not rake smoldering trash with a bare hand. Doing so may fan the smoldering ember and cause it to flame up. Not only would this action further ignite a flash fire, burning trash and grease may stick to your hand.
- Direct the Type ABC fire extinguisher nozzle to the base of any flame and release in short bursts. Do not use long blasts of the extinguisher as this could spread the fire.
- Begin inspecting each row unit with close attention to doors, doffer areas, and lower conveyor ducts. Open doors cautiously.
- Inspect the gear compartment for the drum and doffer drives in the top of the row unit.
- Inspect hydraulic components, paying close attention to valve banks and reservoirs.
- Once all fire is removed or extinguished from the lower portion of the machine, return to the top of the picker and begin removing and extinguishing any smoldering trash.
- Thoroughly clean the picker, inspecting and repairing any hydraulic, fuel, or grease lines as needed. It is best to clean with water after a fire.
- Identify the origin of the fire and correct any deficiencies as needed.
- Service or replace the fire extinguisher before further picking. If you missed a smoldering fire and go back to work without a functioning extinguisher, it may be the last for that picker.
Cleaning and Servicing the Picker
Properly cleaning and servicing the cotton picker each night or morning will result in better performance and lower potential of fire throughout the day. Most producers do a thorough cleaning from top to bottom before greasing, adding fluids, and inspecting and repairing. There are several cleaning methods, each with advantages and disadvantages.
Cleaning Procedures
Check engine oil and coolant levels before starting the picker’s engine for the first time in the morning, but be mindful of the following safety rules:
- Always raise handrails when working on top of picker baskets or bale chambers.
- Always climb and descend ladders facing the ladder and holding onto handrails.
- Never try to climb to the top of a picker with a hand- or armful of tools or hose. Have someone hand you what you need on top of the picker.
- Always engage proper safety locks for baskets and bale chambers before cleaning or servicing in or near those components.
- Never defeat operator-presence switches or wedge tether switches in order to rotate the row unit drums without a hand on the switch.
- Use a broom or your hands to remove large accumulations of lint and trash in the basket or bale chambers. Do this chore any time during the day when waste buildup becomes a fire hazard or if a sensor indicates a false condition. Although it is time-consuming, it can be very effective to go ahead and clean the whole basket/chassis area.
Inspect all sensors and remove any lint tags to prevent false indications. One advantage of hand cleaning is that wiring components are less likely to be harmed by mechanical damage, water from high-pressure washing, or compressed-air removal techniques.
Low-Pressure Water Washing
Many producers use low-pressure water from home or commercial water systems to wash trash from the row units. This method is effective, but it requires an extreme amount of time on larger multiple-row pickers. It also wets the ground around the picker, increasing the chance of slip and fall injuries. Some producers use a water trailer with a portable pump to clean the picker, add spindle-cleaning solution, and extinguish fires. These units spray a lot of water at low pressure, so plan to clean more with volume than pressure.
High-Pressure Water Washing
High-pressure washing is effective at removing trash and grease in row units and is much faster than hand or low-pressure washing. Unfortunately, the water stream can damage seals, wet the ground around the picker, break or unplug wiring harnesses, and force dirt and water into some bearings and grease in gear cases. Always wear adequate personal protective gear – hat, gloves, rain suit, protective eyewear, and boots with slip-resistant soles – when pressure washing a picker. Never direct a flow from a pressure washer towards humans or animals. High-pressure washing is particularly effective at removing grease and trash accumulations inside the row-unit cabinets. It is usually best to wash the tops of the row units last and then move the picker to a dry area before further servicing.
High-Pressure Air Cleaning
High-volume, high-pressure air (150-250 cfm and 125 psi from an industrial air compressor) is very effective at removing trash and lint buildup from a picker. Lower volume compressors can be effective with their airflow magnified and pressure kept at a safe level (not more than 30 psi at the discharge) with a venture type of nozzle. Volume is directly proportional to cleaning power. A heavy air hose (about 3/4 to 1 inch) with a stiff wand (pipe nozzle) is used to direct air where it is needed. This equipment can be very heavy for anyone using it on top of the picker. A dead-man valve should be attached to the nozzle to prevent the air hose from whipping around if you drop it.
Precautions
Always wear personal protective equipment, including eyewear, gloves, boots, long pants, long-sleeve shirt, hearing protection, and respirator or dust mask. Air is less likely than water to break wiring and otherwise damage the picker, but it is still a danger. Do not direct high-volume/high-pressure airflow at radiator fins, hydraulic oil coolers, bearings and seals, electrical and glass components, and air-conditioning lines and condensers. The blast of air can force grit into bearings and grease seals and can break glass, damage seals, and puncture or bend thin components. You can better clean out grease and trash inside row-unit cabinets by operating the unit in a slow idle tethered mode and flushing the moistening system periodically. The ground stays relatively dry, reducing mud and slipping injuries. Never use high-pressure air systems to blow dust and dirt from personnel. After overall cleaning of the picker chassis is done, clean the lights and cab glass inside and out with a good glass cleaner and a cloth or towel. Inspect all lights for proper function, and repair or replace as needed. Follow the manufacturer’s recommended procedures closely for cleaning your particular make and model of picker. John Deere provides a DVD entitled “7760 Cotton Picker Cleaning & Operation # N382998” for specific instructions on cleaning, servicing, and operating the round-module picker. Service the picker as needed for greasing (see operator’s manual), and add fuel, coolant, engine oil, spindle grease, and spindle solution as needed. Round-module picker owners usually replenish the supply of plastic wrap when servicing is complete.
Timing Field Operations/Moisture Considerations
After the bolls open, dry, and fluff, the moisture of seed cotton during harvest has the greatest potential impact on fiber quality until it is ginned. Deciding when to start harvesting is sometimes complex, especially with weather forecasts uncertain beyond a few days. The main things to consider in this decision are the factors that affect lint quality and your revenues. Most growers will schedule harvest 10-14 days after the first application of defoliants. Daily temperatures, soil moisture, defoliant selection, and boll maturity and plant condition when defoliants are applied may shift harvest a few days earlier or later. Several moisture sources impact storage and quality:
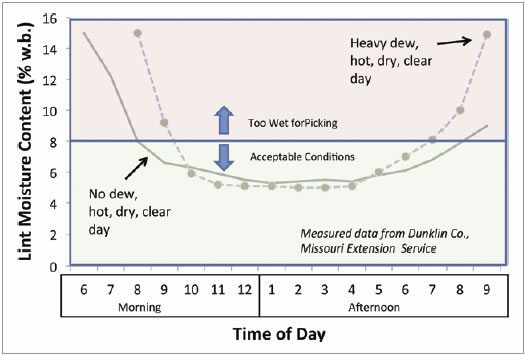
Lint moisture content vs. time of day for typical conditions in Mississippi Delta Environment
Daily temperatures, soil moisture, defoliant selection, and boll maturity and plant condition when defoliants are applied may shift harvest a few days earlier or later. Several moisture sources impact storage and quality:
- Rainfall after cotton opens and before harvesting
- Applying excessive spindle-cleaning solution
- Excessive dew and high humidity, causing damp seed cotton to be harvested
- Green leaf from poor defoliation and regrowth
- Partially or poorly opened bolls
- Immature seed
- Field areas with later crop maturity
Humidity Concerns
Most of these factors will also reduce picking efficiency. Unless extreme conditions occur – such as delayed harvest late in the season – do not operate pickers when relative humidity is above 70% (lint moisture of 8% or greater). Do not pick until all free moisture from dew or rain has dried from the lint. Heavy morning dews extend the time required for seed cotton to become sufficiently dry.
The “seed cotton moisture vs. relative humidity” figure shown above suggests a relative humidity pattern a grower might expect for a typical late-September fall day. Note that by 8:00 p.m. most nights the relative humidity exceeds 70%. Relative humidity patterns vary from this chart for atypical days, daylight saving time, and earlier or later days in the harvest season. Non-Rain-Belt regions will have dramatically lower night humidity, enabling earlymorning, late-evening, or night picking to be successful.
Assessing Moisture Content
Seed cotton containing 12% or less total moisture will usually store for extended periods without quality loss. Green leaf and damp seed usually raise seed cotton moisture above 12%.
Assess the moisture content of lint and seed before starting harvest each morning:
- Handheld moisture meters are usually within ± 1% percent accuracy.
- A sharp crack when you bite a seed indicates a brittle seed coat and seed moisture below 12%.
- One simple test of when harvest may begin is to pick several bolls by hand, ball them into a tight fist, and then release the fist. If the seed cotton springs back to or near the original volume, it is time for harvest.
- Excessive green plant material in the harvested seed cotton is another reason to delay harvest, usually several days. Green vegetation stains the seed cotton in storage and requires ginners to increase heat, which may damage fiber quality. Harvesting clean and dry seed cotton reduces drying and cleaning at the gin and attains the highest possible fiber quality considering varietal characteristics and seasonal weather.
Preventing and Freeing Row Unit Chokes
Row-unit chokes can become very expensive. Frequent chokes may reduce field efficiency by more than 10%, increasing seed cotton losses and costs to the grower and/or picker owner. Several factors affect the frequency of chokes: crop conditions, picking high-moisture seed cotton, the picker’s air system capability, and keeping the row units and conveyance system cleared of dirt, trash, grease, and sticks.
Row-unit chokes can occur while picking in high-humidity conditions, in early morning and late evening, and within the first hour after greasing row units. Higher moisture seed cotton is heavier, requiring a higher air-conveying velocity. Excess spindle-cleaner solution collects on the surfaces of the row-unit cabinet, causing seed cotton to stick. Excess grease can seep out of the spindle nuts and accumulate where seed cotton is conveyed; this buildup collects trash and seed cotton, causing resistance to rapid cotton movement.
Techniques for reducing or eliminating chokes include beginning the day with clean row-unit cabinets, lowering spindle cleaner application rates, using a slower ground speed, and using smaller and more frequent grease applications. Dry, brittle crop conditions, possibly resulting from a freeze, may cause limbs and stalks to break off and plug row units. Slower harvest speeds and delaying harvesting until temperatures exceed 32°F may solve, or at least reduce, this problem.
NOTE: The recommended procedure (see your operator’s manual) is to stop the picker, lower row units completely, switch fans off, place the hydrostat control in park, set the brake, allow the engine to idle to cool for a few minutes, stop the engine, exit, lock and remove the key from the door, dismount the picker, and remove the choke, leaving the seed cotton in the row middle.
No amount of seed cotton and time saved is worth death or injury while trying to clear a choke. Picker row units can fall and trap you, and a picker left in gear can crush or roll over you. Be careful opening row-unit doors. Be alert to the possibilities that the choke may have started a fire or that an animal may be entangled but still capable of biting or scratching. Only an operator properly trained and shown how to clear chokes should practice the following procedure:
- Identify the row unit with the choke from the monitor.
- Raise the row units, disengage the picking-unit drive, and back the picker 5-10 feet from cotton remaining to be picked.
- Lower the row units completely, disengage power to the picking units, place the ground travel lever in park, and set the parking brake.
- Allow the engine to idle to cool and the turbocharger to slow before stopping it.
- Dismount the picker, and close and lock the cab with a key (to prevent a coworker from moving controls while you are under the machine).
- Locate the choke, open the appropriate door about halfway, and observe the cause of the choke.
- Pull the cotton from the door and duct area.
- Remove dirt/trash/grease buildup, sticks, limbs, or other obstructions.
- Close and secure the doors.
- Make a record of row-unit choke.
- Resume picking operations.
- Never attempt to clear a row unit with the drums in operation.
- Never allow or instruct a coworker to crawl under the machine to clean or service it unless you locate that person before restarting the engine.
Consistent Choke Problems
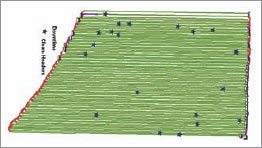
Row-unit chokes (represented by stars) were more frequent early in the morning (picking began at 9:30 a.m., lower part of the figure), after greasing in late afternoon, and during evening operation in this field. Harvest was completed at the top end by 10:00p.m.
If you observe a consistent problem of chokes over several days of picking within a particular row unit, you might solve the problem with an inspection of the fans, fan drives, air-delivery ducts, cabinet obstructions, and conveying ducts. Row-unit chokes are common when moisture accumulates on the doors as a result of high spindle moistener application rates, too frequent moistener system flush operation, and/or over-greasing the bars (if grease and trash accumulates inside the cabinet). Picking rows from the opposite direction when second picking or picking extremely dry or brittle plants affected by a freeze may prompt excessive chokes due to broken limbs lodging in the doors or air-duct entries.
Recordkeeping
A record of breakdowns, chokes, and possibly the remedies can be extremely valuable in improving later operations. At a minimum, records should include the following:
- Dates and times of routine maintenance
- Any difficulties, including chokes and the extent of spindle wrap, making notes specific to the row unit and bar(s)
- Weather and other conditions that may have contributed to chokes
- Time spent waiting for a boll buggy or module builder
- Modules containing unusual green leaf, green weeds, or wet cotton (for example) from uniquely different areas of the field
- Use these notes to expedite ginning of certain modules. Review the notes before initiating repairs, focusing on identifying and correcting the most frequent problems.